
Star Castle is a vector game. Commonly referred to as a Cinematronics game, the credit really is owed to the sole inventor of this game, Larry Rosenthal. He actually designed the entire thing originally for the game Space War. The designs included a CPU board, an audio board, and the digitally controlled X-Y monitor system. Not only did he design all of the hardware, he wrote the game code. Eventually, the designer was hired by Cinematronics to mass produce the games on the condition that he receive a royalty for each game sold. Eventually, and the designer came to odds with the company over the amount of compensation and he broke out on his own and founded his own company called Vectorbeam. He released his own version of Space Wars, calling it Space War. It looked almost identical to the Cinematronics version. Rights to the game remained controversial for some time. Eventually, Larry won the full rights to his designs and soon afterward, Cinematronics was no more. However, while the inventor worked for Cinematronics, he produced several other undeniably classic games including Star Castle, Rip Off, Armor Attack, Solar Quest, and Tail Gunner (a true 3D game that came out before Atari's Battlezone). Regardless of the controversy surrounding the rights to the game designs, it is a fact that the bulk of the games were built on Cinematronics assembly lines. Still, it is possible to find CCPU game boards bearing the name Vectorbeam.
Not only did I love playing many of the Cinematronics games in the very early 80's, I've recently become impressed by their technology and so I enjoy restoring them. No games made by any other manufacturer are similar in design.
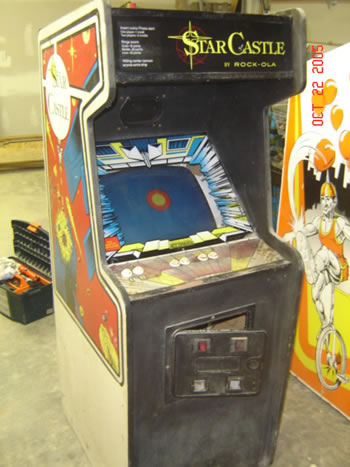
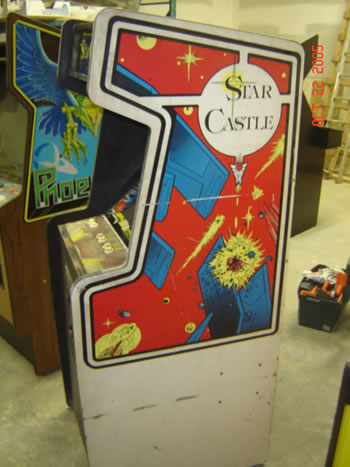
My first attempt at restoring a Cinematronics game is my Star Castle machine. It is interesting to note now that another company called Rock-Ola obtained a license to build and sell the Star Castle game. You can quickly identify a Rock-Ola cabinet because the sides drop straight down from the control panel. A Cinematronics version curves inward a few inches just below the control panel. Also, the marquee and the bezel say Rock-Ola on them instead of Cinematronics. The Rock-Ola control panel artwork uses little spaceship icons above the buttons instead of text. Reproduction control panel overlays that I have seen have always been the Cinematronics version. Personally, I think the Rock-Ola version is more attractive so I am working on producing a vector file based on a scan of an original Rock-Ola control panel overlay. Getting it printed is another issue.
I purchased my Star Castle machine from someone who lived about a 3 hour drive away from me. I had to drive there on the coldest and windiest day of the year. I'll never forget driving all the way there and back with a small open trailer and having to deal with high winds and ice everywhere. Getting the machine home was somewhat of an adventure all by itself. After collecting several machines, all from different distant locations, I've found that bringing each and every one of them home was a memorable experience.
My Star Castle was in very poor condition when I bought it. It didn't work at all. It needed a lot of electronic work and cabinet work as well. I tried turning it on but all it did was pop its circuit breakers. The one saving grace was that the side artwork was relatively intact, a very rare and valuable feature. As far as I know, nobody has produced reproduction side art, bezels, or marquees. There is a reproduction control panel overlay available of the Cinematronics version.
The restoration process:
Inspection:
I took a lot of pictures so I'd be able to recall how it all was put together. As you can see, there's a lot of dirt, stains, scratches, rust, etc. This is going to be a big job.
Disassembly:
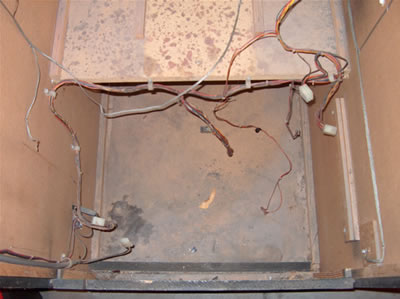
I had to take apart the entire machine, removing all metal parts, the speaker, the coin door, the monitor, marquee, bezel, circuit boards, power supply, wiring, everything. Here's a shot of the interior looking down through the back door before I took out the wiring.
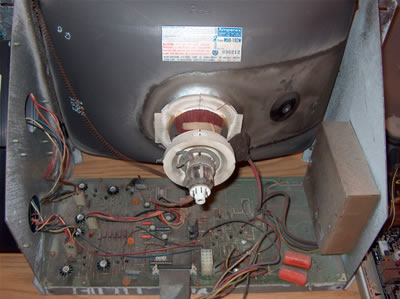
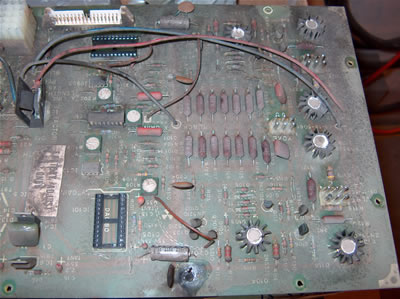
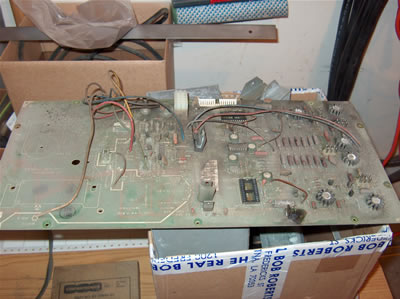
Here's the monitor and its PCB assembly. Have you ever a seen a circuit board this dirty? It makes one wonder if the machine was ever left outside or in a barn for a few years. Even the flat ribbon cables were practically black. The steel rim around the CRT was completely rusted.
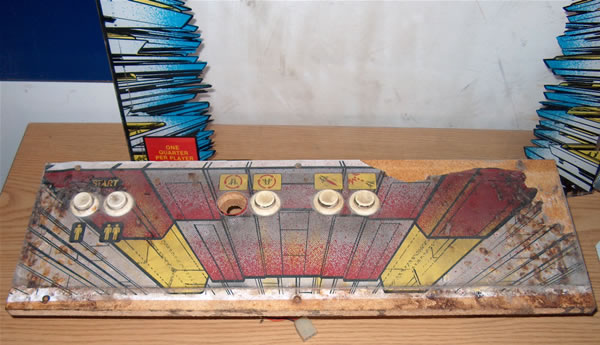
Here's the control panel. This was the worst case of smoker's abuse that I've ever seen. The player-1 start button ring was so badly deformed that it wouldn't even press down.
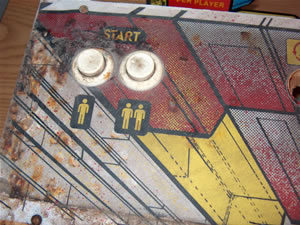
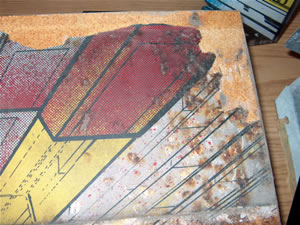
Here is a closeup of the littles ships over the buttons (click image to enlarge):
Cleaning:
What do you do with a dirty mess like this? Before you can really do anything at all, you have to clean everything. For some parts, I had to sit down with a box of Q-tips and paper towels and a bottle of rubbing alcohol and clean every nook and cranny by hand. Doing this for hours on end is no joy. There had to be a better and faster way.
PCB's & wires & cables:
I thought of putting the PCB's and the wiring harness into the dishwasher. Sounds crazy eh? I know, most people are taught from birth that electronic things don't like water. Actually, water doesn't harm most boards or components if used properly and everything is dried thoroughly. First, I removed all socketed chips. I set the dishwasher for water-heat and no-heat dry. I only used about 1/4 the normal amount of soap. The boards and wires came out looking like brand new.
CRT:
I washed the CRT with the yoke still attached with an electric pressure sprayer. Of course I widened the spray so as not to damage anything. I did this on a nice sunny day and simply left the CRT sitting in the sun to dry all day.
Cabinet:
The first thing I did was vacuum out the cab over and over again using a crevice tool and brush tool. It's amazing how much dirt you can get out just by doing this alone. Removing the stains in the wood was another issue. I tried a few different cleaning products intended clean wood but none of them worked well. The worst thing is that most of the wood was particle board and that stuff expands and comes apart when it gets wet so you have to work very fast and dry it again before things go very bad.
Structural Repairs:
Metal Parts:
The metal bar that sits at the seam between the top edge of the control panel and the bezel was missing entirely so I had to make one from sheet steel. The coin door had been broken into, or at least an attempt was made, and it was badly bent inward. Also, someone had drilled some holes into it in an uninspired attempt to attach a small padlock latch. I was going to braze the small holes to fill them, but since they were less than 3/16" in diameter, I decided to do something simpler. There's an amazing 2-part epoxy called JB Weld. All you do is put some scotch tape over the front of the holes (grind off any burrs first) and then fill the holes from the inside. After it cures, peel the tape off of the front side and you'll have a perfectly smooth paintable surface. You will be hard pressed to see the repair after painting and it is surprisingly strong.
Cabinet:
A wooden bar spanning the width of the cab interior along the top of the bezel was missing. The back door was so beat up that I decided to replace it. The sides of the cab were coming unglued from the cross panels. I made a new cross-bar from a piece of hardwood using my tablesaw. I bought a couple of long bar-clamps and used Gorilla Glue, the strongest glue in the world, to pull the cabinet sides back into place. The next challenge was to repair all of the exterior wood where it was damaged by age and abuse. There were chunks broken out along panel edges. There were holes from screws that people had driven in carelessly to hold the back door in place after the original locks were damaged or removed. I personally really hate it when people do this because a new lock is pretty cheap. The problem is that people just don't care if they wreck the thing or not. I guess the excuse is that it's on the back so who cares. In any case, I use automotive bondo to fill in holes in the wood. I use the glass filled brand to fill areas that will be put under physical stress, such as around leg levelers and such.
Back Door:
I made a new back door from scratch using a sheet of 5/16" thick melamine board. I chose this because it was cheap and it was already laminated on both sides. The sides were white. I would've preferred black but it wasn't available. Besides, it was on the back so who cares. Seriously, it was a good choice. A lot of the machine is white so the white back door looks pretty nice. The board that I purchased at Home Depot was already exactly 24" wide and 48" long so all I had to do was cut a few inches off of one end to make it the correct length. I then bolted the cut-off piece along the bottom edge of the door to make the retaining lip, just the like original door had.
Painting & Resurfacing:
Metal Parts:
I hired someone to sandblast all of the metal cabinet components including the moldings and the bare coin door and frame and coin box. Once I had the metal parts stripped, I spray painted them with Tremclad primer and then with Tremclad semi-gloss black. If I had had somewhere available that could have powder coated them instead, I would've done that. It produces a stronger and more durable finish that looks more like factory original. Still, the cheap spray bombs do a decent job considering that the machine will see only home use.
Cabinet:
After removing all of the T-molding and cleaning the cabinet throughly, I decided to paint the entire exterior. All of the surfaces that were originally black, I painted using Tremclad semi-gloss black and a foam roller. I would've preferred to spray the black, but I'm not that ambitious. The roller worked great and the job turned out well. Then I tried to paint the sides white because they looked so faded and stained with dirt. I tried using the roller method again. First, I kept dripping on the floor so I put down sheet plastic. Then I got runs so I let that dry, then sanded it down and tried again. Then I slipped on the plastic and landed on the floor with my entire arm lying against the side that I'd just painted. That was it. Somebody "up there" was having a laugh at my expense. Ha ha, very funny. That's when I decided to spray the white onto the sides. I bought a Wagner electric sprayer. It's a piece of junk. You're much better off buying an air-gun and a small compressor. Anyway, I masked off the entire machine inside and out, including all the way around the side-art. I laid plastic sheet over the end of my driveway and on a nice sunny windless afternoon, I put the cab out there, put paint in my sprayer and went to'er. At first, the sprayer wouldn't suck the paint up into the gun part. Once I got that going, it sprayed in huge droplets rather than a fine mist. I adjusted it as far as it would go fine and just had to live with it. The job required a spray tip with a smaller orifice but the stores don't sell those so what can ya do. I ended up putting on about 4 coats, each as thin as possible. After letting it dry and removing the masking, it looked almost like brand new again. So I guess it was worth it to go through all the trouble after all.
Also worthy of note, I resurfaced much of the cabinet with black formica sheet and contact cement. It looks better and lasts longer than paint. I resurfaced the entire front of the cabinet, the back sections above and below the back door, and the top. After applying the formica sheeting to the cabinet, I had to open up all of the vents holes, trim the edges, and so on. I used a hand-held router for this task. I use a straight 1/4" diameter routing bit that has a ball-bearing on the tip. All you do is set the depth such that the bearing will roll on the sides of the holes in the panel or along the edge of a panel. Then you just run the router along the edge and it trims everything perfectly and quickly. Yes folks, it's just that easy.
After everything was painted and resurfaced, I installed new leather-texture black T-molding and re-installed all of the vent covers.
Control Panel:
The control panel was a real disaster as you can see in the photos above. Fortunately, I was able to find an online supplier for a reproduction self-adhesive overlay. It cost about $30 USD but it is well worth the expense because it really makes the entire machine shine. Can you imagine how much less appeal the machine would have without the correct artwork? I also ordered brand new buttons and leaf switches. Before installing all of the new artwork and parts, I had to completely strip the panel of all remnants of the old overlay and adhesive. I used a wide putty knife to scrape off most of it. I used PolyStrippa paint remover to remove the adhesive. After the this gooey stinky stage was complete, I cleaned the wood with acetone. I then painted the entire panel a nice basic flat white using a roller and sponge brush. After a few coats were applied and dried, I lightly sanded the top surface to make sure that the new self-adhesive overlay would stick well and stay stuck. I cleaned the surface with acetone again after sanding to make sure there was no dust or fingerprints left. Acetone also makes the adhesive stick better. Sticking the artwork overlay onto the panel takes some care. Before removing the backing, I like to prepare things first by cutting out all of the holes with an X-acto knife (if they aren't already die-cut from the supplier). I try to line up the artwork with the button holes first. I usually place a lamp behind the panel so that the light shines through the holes and the overlay so I can see exactly where the artwork is relative to the holes. If the artwork and the holes are not exactly the same size, try to split the difference. Remember that the buttons will cover a bit of that error. Once placed, I put on a couple of pieces of tape to hold it and then I cut the first hole with the knife using the panel hole as a guide. Then I install a button to hold the artwork down more firmly and move on to the next hole. I cut each hole and install each button working from one end to the other. Once all of the buttons are installed and holding the overlay down, I remove a long 2" wide strip of the backing sheet along the length of the overlay and press it firmly down onto the panel so it sticks. I also use a roller tool to press it down and squish out any air bubbles. Most adhesives are pressure activated so press it hard and roll it several times. Once this is done, I remove all of the buttons. Then I roll/curl the overlay back (do not fold it obviously) and remove the rest of the backing sheet. I then allow it to roll back down. I like to use the edge of a plastic card (like a bondo or putty spreader) to smooth the overlay down working from the stuck edge towards the as yet unstuck edge until the whole thing is stuck down and bubble free. Then I use my roller to really press it down hard to get it to stick as firmly as possible. Now that the overlay was done, I installed all of the buttons, then the new leaf switches, and then I wired it all up to complete the entire panel assembly. Then I installed the panel onto the cabinet and attached the metal moldings.
Continue to Star Castle page 2 of 8, electronics repair
Arcade List ---- or ---- Home
View Star Castle on KLOV.
View list of electronic components for restoration work.
View Cine Keltron monitor rebuild tips page.
View PDF "Biltronix_Cinematronics_CPU_RevB_to_RevK_Modifications.pdf"