Control Panel:
The control panel was a real mess. It had no joystick or buttons or switches or wire or anything. It had several extra holes cut into it, burrs in the metal, and some weird and wrecked sopwith camel airplane art overlay. Fortunately, Galaga is so popular that it is easy to find very good quality reproduction artwork. I wanted to spare no expense when it came to the control panel because it is the human interface to the machine. For me, if the controls and the panel feel rough or grimey or cheap, I just can't enjoy the game. I ordered brand new buttons, a new joystick and leaf switches and a wiring harness.
Installing the overlay was pretty easy. I like to wipe down the surface with acetone because it helps the adhesive stick better. Sticking the artwork overlay onto the panel takes some care. Before removing the backing, I push out the die cut holes. I line up the artwork with the panel by installing the buttons first. Once all of the buttons are installed and holding the overlay down, I remove a long 1 " wide strip of the backing sheet along the length of the overlay along the top edge and press it firmly down onto the panel so it sticks. I also use a roller tool to press it down and squish out any air bubbles. Most adhesives are pressure activated so press it hard and roll it several times. Once this is done, I remove all of the buttons. Then I roll/curl the overlay back (do not fold it obviously) and remove the rest of the backing sheet. I then allow it to roll back down. I like to use the edge of a plastic card (like a bondo or putty spreader) to smooth the overlay down working from the stuck edge towards the front edge until the whole thing is stuck down and bubble free. Then I use my roller to really press it down hard to get it to stick as firmly as possible. With the overlay done, I installed the new leaf switches. I also installed the 10 little chrome carriage bolts that hold the joystick and the metal retaining brackets. Then, finally, I installed wiring harness.
The new joystick was a plastic 4-way with microswitches. I had to make a couple of aluminum blocks and install them on the bottom of the joystick housing in place of two of the switches, leaving only two switches, and limiting the travel to left and right.
Here's the completed control panel:

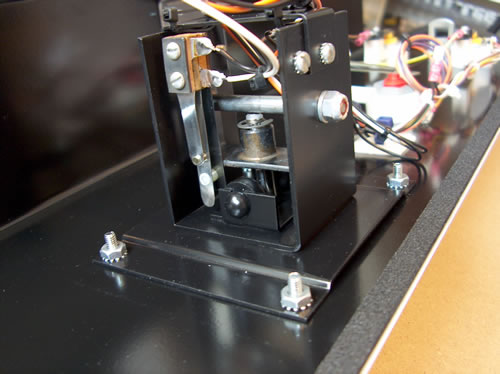
Here you can see the joystick with microswitches:

Jumping ahead here a little for a moment, after I had played the finished game for some time, I came to realize that I really didn't like the feel of the new joystick or the clunky noises it made while playing. My hand had a tendency to get a little tired also. I managed to find an original and complete 2-way Galaga joystick on Ebay. It had some rust and wear but an SOS pad and some spraypaint fixed that. The original ball and shaft was in good shape so all I had to do was polish the shaft to make it look new again. When I reassembled the joystick, I made sure to grease the 3 brass bearings and the points where the stick-bracket pushes the stick-centering leaf springs of the switches.
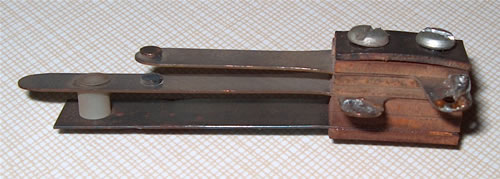
The leaf switches were pretty worn and a bit ugly. I couldn't simply replace them because they have a small white plastic button attached to them that the stick-centering springs push on. All of the new replacement leaf switches that I've seen do not have the button. I probably could have glued something onto the blade of a new switch but I didn't want to bother trying to mcgyver the thing. Some folks might have opted to simply bend the blades way over so they would contact the spring, but that's just not how I like to do things. Instead, I disassembled the switches and polished the metal parts and the contacts. Good as new.
Original joystick leaf switch:

Here's the freshly painted joystick assembly installed in the control panel. Look at the shine on those switch blades!


Interior:
While the cabinet was completely empty, the entire interior was cleaned and painted white. All steel parts except the coin box rack were painted primer gray. Things look a lot brighter in there now.
Wiring & Lights:
The starting point for the wiring was a new Real Bob Roberts Galaga harness, the switching power supply version. I also purchased the door interlock switch, the pushbutton power switch and switch plate from Bob. I wired up my new power supply assembly and everything else myself using various gauges and colors of stranded hookup wire. For the 115 VAC stuff, I bought 7 meters of 16 gauge stranded heavy duty 3-conductor rubber covered power cord. I used it for the new power cord of course, but I also used it to run power to the marquee lamp, the power switch and the monitor. The marquee is lighted by a brand new trigger-start steel-enclosed fluorescent fixture that I mounted on a white board. The board is mounted vertically using two 5" steel L-brackets (shelf braces). I installed molex male & female connectors in the power cord at the marquee, the monitor, and the power supply in order to make disassembly or repair easier. The coin door and control panel also have new original style molex connectors.
Continue to page 4 of 4, Completed project
Arcade List ---- or ---- Home