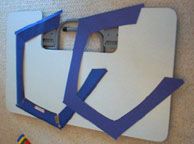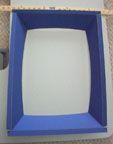
Bezel Creation Tutorial Who here has gotten a game and found that the monitor bezel was completely warped, falling apart, or water-damaged? I'm sure it's a common story, so I have set out to make my own. The bezel in question was a blue one from my Toobin'. It was badly warped and falling apart at the seams, as well as an amusement company sticker was plastered to it. February 22, 1999 Step 1 First, and went out to the local craft store and bought some thick poster-board. I found that the poster-board used to frame pictures worked best, because the multi-layer cardboard made scoring much better (no, not game scoring, but bobby knife scoring). Try to match the color of the bezel as best you can, and to get a big enough piece (cost: $3.50). When the original bezel is laid flat, it can take up a good amount of space. Find a hard-flat surface to work on, and make sure that it is an area that can get scarred. I had an old collapsible computer table that worked for me. Lay the original bezel out flat on the poster board and make sure that it keeps it's position. Take a pencil and SLOWLY trace the bezel. The reason I say slowly, is that the bezel on top will want to shift as you trace it. After you have it traced, take a yardstick or metal ruler (a metal ruler worked best, because the hobby knife will not accidentally cut into it) and SLOWLY cut around the OUTSIDE of your outline (leaving the "inside curves" for another step), and cut away the excess from the large piece of poster board. It may take three swipes with the hobby knife, but it is better to make multiple softer cuts, than make one hard cut and found that you strayed off the line. Step 2 Now that we have the outside cutaway, it is a much more manageable shape to work with. Now comes the PATIENCE part. Start at one end and SLOWLY cut the angles. Do multiple soft cuts in case you stray from a line. If it's a soft cut, and you mess up, you will not notice it when the bezel is assembled. After you have it completely cut out, you should have something that looks like the picture to the right. Step 3 Now that we have the shape, we will need to "score" the board so that we can bend it without it warping and ripping. Pay close attention to your original, you do NOT want to score the wrong side by accident. If it bends away from you, score the side that faces you, if it bends toward you, score the side that is away from you. No sweat, right? I found that two swipes with the hobby knife (enough to cut about two-thirds of the way through) was good enough to get the board to bend firmly. The easiest way to bend the thin edges on the outside of the bezel it to place it on the edge of your work surface, and take your yardstick or metal ruler, and slowly apply even pressure to bend it to the position that you want it to be at. Don't worry, everything does not need to be perfect here, as you can make tweaks later. After you have everything bent into place, take a small (1 inch by 2 inch) piece of the poster board, and score it down the middle. We are going to glue this over our seam to hold the whole thing together. Omigosh, it looks like a bezel! That's it! Congratulations! The difference from the old bezel to the new one is astounding. After it went in to my Toobin, it looked GREAT! |


