|
Way back in 1980 I started bugging the techs at WMs about this faux pas of a battery system that they started out using. I had lots of ops complaining about the loss of memory, curiously enough, because they did not want to comply with store owners in giving them a key to advance the game into operation again. Of course, they did not want to be going to location every day to do it for them, either. I'm fairly certain that it was a Tri Zone pinball that one of the local music companies dumped off at my shop & said they had enough & to do whatever it took to get it stable for location. That flakey 3 x AA battery setup was just an albatross & really a black eye for WMs good reputation. I'm embarassed to say that I don't remember the tech's name out there, but I believe it was Tom or another easy 3 letter name like Jim, anyway each time I called & chatted about it we seemed to get off topic & onto Bingo machines... what I had broken into the business on, and what he seemed to have a fancy for. At first, the advice was to tighten up the holder then on to install a new holder with fresh batteries and it evolved to double strapping the batteries in & even a mention of drilling holes in the PCB to run another cable tie through, none of which was appealing to me, even though I did try them without a satisfactory outcome, so I setout to change it completely to a backup system that would work. The new kid on the block... well, through the 70s... was the lithium battery. I'm by no means a battery expert, but I setout to obtain all the info that I could on them. Seemed like everyone was warning how unstable they were and one person I spoke with told me that tossing one into an open fire could blow up a building :-() Enough good reports made me file this away in the back of my mind, because by this time others had been telling me how far the technology had advanced & that they were perfectly suited for my needs at this point in time. They were reported to have a shelf life of 10 years... to which I can say now, was an understatement as I changed my battery in my test bd in June of 2000 for the first time since February of 1986... and were very easy to install with several types to choose from. The pinball machine had been at the shop for several weeks by now, so I called the owner of the music company & explained to him what I was going to do & that the research had slowed me down a bit. I told him I'd like to keep the machine for a few more weeks to see how this lithium setup was going to work out. Hmmm... he said that the last distributor that had been servicing for him would have kept the machine for 6 months anyway, so keep it as long as I wanted to. After installing the lithium... still very cautious as that one reply was rattling around in the back of my mind, but one should always approach the unknown with caution, anyway... I tested it in every manner that I could think of including the mule kicks to the bottom of the cab when it was sleeping :-) This was it! I could not steal it's memory from ram... it was solid & stable as most had told me. Caveat: You should take care to follow recommendations by the battery mfr in regards to safely using, handling & disposal of lithium batteries. Never try to charge one of these lithiums, or use it in a circuit that has a built-in charger, as with anything, improper use can be dangerous. This was such an easy conversion, one that I knew had to be done & could be no worse than the existing system, so I bulled right into installing them wherever I could find an opportunity. I remembered a local root beer joint that had a similar complaint on a Defender & called to ask if it was still giving trouble & the reply was an emphatic yes, so I offered to go out & install this conversion for them at no charge. The owner was thrilled and even though the 3 basic machines in the place were owned by him, he still was aggravated that he had to open the coin door so often to advance the machine into operation. This particular case was my first callback, albeit a few years later, and the complaint was it's doing the same thing as before. Even though this was a common complaint... repair the monitor & 8 months later get a call stating that the game was doing the same thing it was when I repaired it last month - no sound!!! ... I still wondered if this was going to be a flaw in their longevity. Fortunately, when I got there I found it was in ram error & a quick replacement of a 4116 brought it roaring back to life... no, this service call is not lagniappe, I had to tell him :-)
Trying to get back on track.... everything that I had installed this into was working just fine, so I called the WMs tech line again & told them how well this was working & asked if they knew of any repercussions that I might have, and Tom, Don, Jim, (sorry) whomever it was, said they thought it was a good solution, but that only time would tell. He said he was going to take it up with their engineers, or something to that effect, and he would let me know if they found fault with this setup. That was the last of our conversations. In later WMs boards the lithium battery came installed, albeit a solder in type that I had opted not to use making it easier for ops to change the battery, if need be, without losing mem. I'd like to think I had something to do with that decision, but the truth of the matter is, that would be just a locigal progression of technology in any event. It was just bound to happen, sooner or later. Okay... okay. Enough with the ancient history talk... how do I do this conversion! Let me snap some pics & tell you... oh no, more pics! I think they are more informative than the thousand preceding words :-) Let's look at what happened to the old battery system & the boards over time.
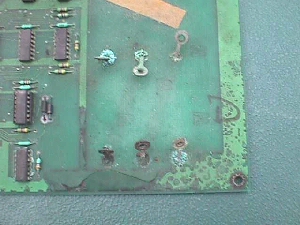 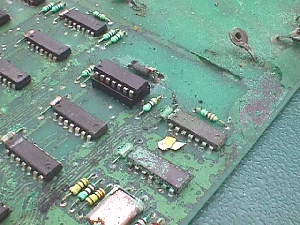 These are from some old trade in boards that have been sitting around the warehouse without any batteries in them for years, but once the alkaline starts the erosion process it just keeps spreading regardless as to whether you have batteries mounted, or not. It snakes it's way along the traces & surfaces to attack components sometimes on the opposite end of the PCB :-(
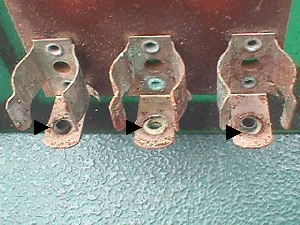
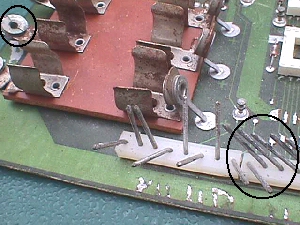 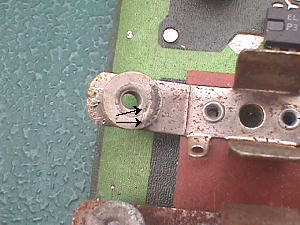 You can see above that it also attacks the header pins... I bent these over so that you could view the damage since they are no longer any good at all & need to be replaced :-( If the contacts are like the one in the pic next to it, they are going to be intermittent, no matter what you do to attempt correction.
 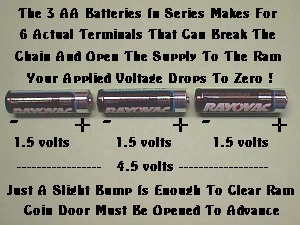 Above you can see that the actual contacts inside the holder are completely gone with only the rivet showing in the center. You can also see that if any one of these terminals is the least bit corroded it will open the supply to the ram causing it to drop to zero & thereby robbing it of any data that was stored in it. This does not necessarily mean that the power needs to be off, either, as many have said before, especially in the case of a pinball machine that gets banged around a lot... not that vids don't, because I've seen them after a wild Saturday night & it's a wonder that they work at all... and this is just not immediately known as it has no effect until the game is turned off. Of course, if the batteries fall back into place & are making good connection before you turn the game off everything will be saved, but are you normally that lucky? :-) Here's all you'll need to make this conversion:
You can burn up $5 worth of gas running around town looking for these components, or I have them available as a kit for $5 when you're ordering your other supplies.
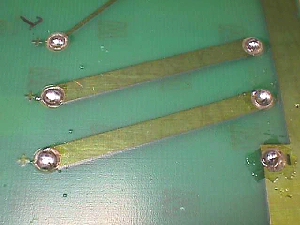 
K... Let's get started by flipping the board over onto the solder side & heating up each terminal of the triple AA holder & flowing in some new solder to reactivate that old won't-even-melt-solder. Start over again with the first one you did & this time remove all the solder with a solder sucker. The tough one is usually the one that actually connects to the ground rail. If you have all the others free you can take a small screwdriver & insert it under the holder at the stuborn joint, heat & gently pry at the same time. It'll usually pop right out that way.
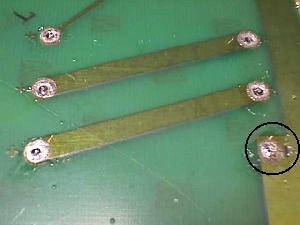
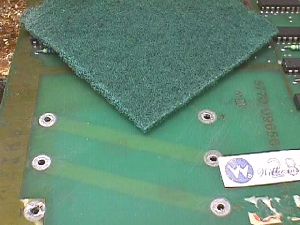 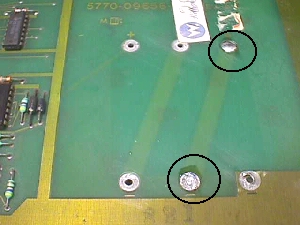 Next you'll want to Scotch-Brite those thru-hole pads so that your solder will adhere & to clear away any corrosion left on them. Do both sides. Now close in the bottom middle & upper right holes with solder as show in the pic above right with black circles.
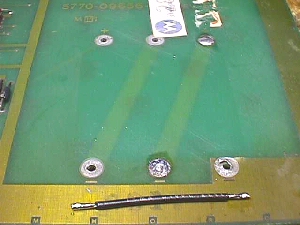 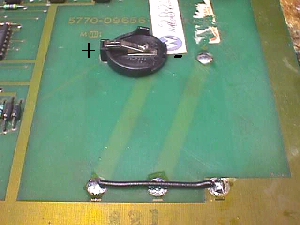 Take the 2" piece of wire, strip back approximately ¼" on either end & tin with solder. Bend the leads to 90 degree angles & drop it through the two lower outside holes as pic'd above... solder it in. Now drop the battery holder in from the top with the + terminal in the upper left hole & the - terminal in the upper middle hole. This is a perfect drop in alignment, so when you flip it over to solder it in you can lay the holder on your bench & the weight of the board will keep it in place while you solder it.
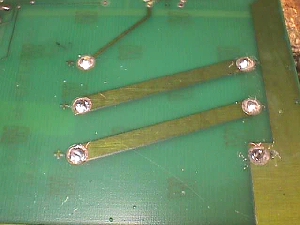 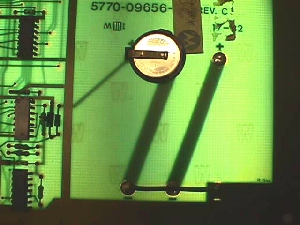 Slip the battery in with the + side up & clean up any mess you've made with solder on both sides of the board & you're good to go. The pic above right is taken on the light board & you can see the right end trace that we eliminated very clearly. It is just sitting there taking up real estate now. The jumper on the bottom gives us a new path to ground & the holders positve terminal connects right into the ram backup power circuitry. You can measure your voltage to see that everything is copacetic if you like. Measure from any logic ground to the blocking diode on the left... first component you see the trace going to above. You can follow along the path it takes, which is a long one, over to the cmos ram located in area of D1 or D2 grid on the board... near the CPU. If you still experience ocassional memory loss after installing a lithium battery, you'll find most times that it is due to the poor header connections on the linear power supply. In cases where you already have swapped over to a switching power supply... thus eliminating these headers... you'll find that the problem is a weak component associated with this memory circuit from the few diodes, to resistors, to capacitors, transistors or even other kept alive ICs in the circuit, depending on which board you are working on. Don't have a clue how to track down & repair this problem then maybe your shortcut is to install a Dallas nonvolatile SRAM DS1225. K... time for a quick review list for those who work better from them.
This will work in many other cases, but beware that you cannot just drop this in place of a ni-cad without defeating the charging system. This can be done by installing a blocking diode in the + line. I'm quite frequently asked how one can tell which way to install the diode. I think it is easiest for a newbie to think of the cathode stripe on the diode as a gate in the front yard fence that only opens outward as you are leaving your home, with the body being your walkway, of course. No one can walk up to your gate & pass through to enter your home, but you can walk down your walkway (diode body) and out through the gate. A diode with the complete symbol imprinted on it will have an arrow with it's point butted up to the cathode band signifying the direction of flow. If used as a blocking diode for a lithium battery you would want the cathode on the end furthest away from the + terminal, thus allowing the flow down the walkway to the components, but blocking at the gate any flow back towards the battery. I feel compelled to place the battery warnings here, as well. This is a compilation of warnings from Rayovac®, Duracell®, Energizer® & Panasonic®.
|

