Powdercoat
Refinishing
A couple of years ago I bought a fairly gutted
Asteroids machine for $50. It had been sitting in a damp
storage area and the bulk of its metal parts had been
damaged by rust and corrosion. Since the sides of the
machine were in quite good condition (and since I already
had the innards of another Asteroids that was dry-rotted
beyond salvage) I decided that this one would be a good
candidate to restore.
I always like seeing those "before and
after" type home restoration programs on TV, so I
thought it would be fun to document the restoration
process piece by piece as a record of the machine's
progress and as a help guide to others. This first part
will describe refinishing the metal marquee holders on
the top of the machine.
Atari finished many of the metal pieces on their
classic arcade games with a technique known as
powder-coating. Powdercoating is a process by which a
tough (usually plastic based) finish is actually baked
onto the metal. It is more durable than most painting
processes and generates that fine-grained
"orange-peel" like surface unlike a spray-on
paint would..
Having previously refinished parts using multiple
coatings of "Rustoleum Matte Black" (now just
"Rustoleum Flat Black" is available) spray
point I was familiar with its overall good results, but
wanted to get closer to that classic Atari texture. A
little bit of searching revealed that home powder-coating
systems were available and affordable ($99 for the unit I
purchased).
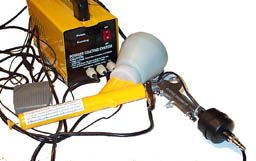
| I proceeded to buy a powdercoat
system from Harbor Freight (www.harborfreight.com)
as well as a pressurized sand-blaster. (Total
damage-- right around $200) Powdercoating works
by electrically charging a fine powder of colored
plastic to "stick" it to a grounded
piece of metal. (It's similar to how dust sticks
to a TV screen.) The powdercoating machine
generates a high-voltage which charges the
particles of plastic as they're blown out of the
"gun" by compressed air. Once the
plastic powder is stuck to the metal the metal is
heated and the plastic baked on.
|
 (click to enlarge)
|

(click to enlarge)
|
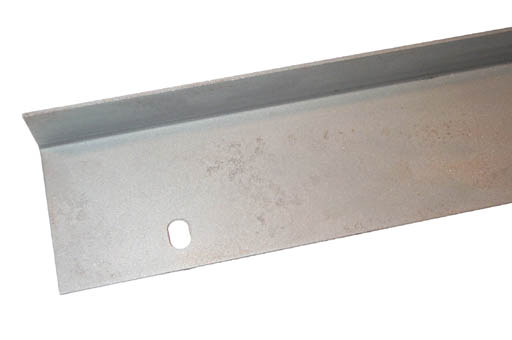
I decided to start my project with the top
piece of the metal marquee holder off of the
Asteroids machine. ~20 years of damp Pacific
Northwest weather had caused it to rust and
bubble the old finish off. The metal was
moderately pitted and generally in poor shape. |
 (click to enlarge)
|
I loaded up the "abrasive blaster"
with dry river sand (about $1.50 at Home Depot)
and proceeded to make the largest artificial dust
cloud known to man while blasting the old paint
off the metal. (Note to self: next time buy some
kind of "washed" sand (like for a
sandbox) or get some "real"
sand-blasting media instead!) Mess aside, the
sandblasting worked pretty well and left me with
some reasonably clean metal. I'd have to use a
more abrasive/smaller media to get all the last
traces of rust off, but for now this works for
me.
|
Some Naval Jelly was used to neutralize the remaining
deep-rooted rust and then the piece was rinsed/brushed
with acetone to get any remaining contaminants or oils
off of it. (Use a lint-free cloth or wire-brush when
rinsing away the dust and oil-- getting lint all over the
metal will mess up the finish!)
Using the powdercoating machine is pretty simple. An
alligator-clip is attached to the metal to provide a
ground path, a 10-15 PSI dry air source is connected to
the gun and when you're ready you press a foot-switch
down and pull the trigger on the powdercoating gun. A
semi-focused cloud of plastic dust (a LOT like
photocopier toner methinks!) coats the metal and sticks
to it rather well. Wear a GOOD respirator and work in a
well ventilated area; the plastic dust is ultra-fine!
Don't work near open flame either lest your arcade game
refinishing project end up in a demonstration of why
grain-elevators explode...
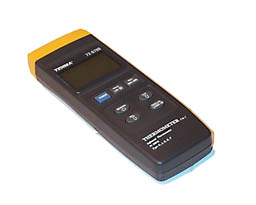
| With the powder on the piece, you need to
transport it to an oven for baking. (Without
brushing any off!) Ideally this would be a large
industrial oven, but an old home oven will work
well too. (They say not to use an oven that's
still used for food-- apparently the plastic
outgasses some nasty stuff.) I didn't have an
oven available, so I improvised and put the piece
in an old patio grill and used an electric
heating element from a stove to heat it up. The
plastic seems to melt at about ~200F and the
instructions said to bake it for 15 minutes at
400F after it melts to cure it. I used an
infra-red non-contact thermometer to check the
temperature. I moved the heating element around
to get an even "bake" across the metal. |
 (click to enlarge)
|
 (click to enlarge)
|
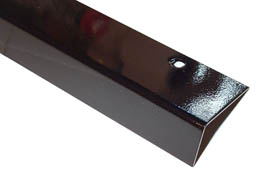
Ta-da! One powdercoated marquee holder (and
all for less than ~$300 or so in tools ;-) ! The
powder that I used has a very glossy finish
(almost like the enamel in a sink), but it
yielded very good results. I'll probably try to
find a more matte finish sometime, but Asteroids
will just have to be a little "shiny".
It looks good though. You can see in the close-up
the slightly textured (but smooth and sealed)
finish. The powder has some nice properties
once baked-- it's completely waterproof
(essentially just a sheet of plastic sticking to
the metal); it can be applied in multiple coats
(which will just melt together); and if a piece
of crud gets on during baking you can pick it off
and the plastic will flow together an cover the
holiday (unlike paint).
|
All in all a pretty successful first attempt!
Refinishing the game's control panel this way will be...
Interesting. Not sure how to do something quite so large
(an Asteroids control panel is MASSIVE!) without a big
oven. On the other hand, the powdercoat seems to be very
forgiving when you work in sections, so just heating a
smaller area at a time might work OK.
Some other useful powdercoating links:
http://www.hotcoat.com
http://www.harborfreight.com
http://www.eastwoodcompany.com
Updated: 6/19/2003
|